Seita's Place has Migrated from Wordpress to Jekyll!
A New Era
This post marks the beginning of a new era for my blog. For almost four years (!), which saw 151 posts published (this post is #152), Seita’s Place was hosted by Wordpress.com. Over the past few months, though, I’ve realized that this isn’t quite what I want for the long run. I have now made the decision to switch the hosting platform to Jekyll.
Many people others (e.g., Vito Botta and Tomomi Imura) have provided reasons why they migrated from Wordpress to Jekyll, so you can read their posts to get additional perspectives.
In my case, I:
- wanted to feel like I had more control over my site, rather than writing some stuff and then handing it over to a black-box database to do all the work.
- wanted to write more in Markdown and use git/GitHub more often, which will be useful for me as I continue to work in computer science.
- wanted to more easily be able to write code and math in my posts.
- wanted to use my own personal text editor (vim is my current favorite) rather than Wordpress’s WYSIWYG editor.
- was tired of various advertisements underneath my posts.
- wanted to be more of a hacker and less like the “ignorant masses,” no offense intended =).
Jekyll, which was created by GitHub founder Tom
Preston-Werner1, offers
a splendid blogging platform with minimalism and simplicity in mind. It allows users like me to
write posts in plain text files using Markdown syntax. These are all stored in a _posts file in
the overall blog directory. To actually get the site to appear online, I can host it on my GitHub
account; here is the GitHub repository
for this site2. By default, such sites are set to have a URL at username.github.io, which for me
would be danieltakeshi.github.io. That I can use GitHub to back up my blog was a huge factor in my
decision to switch over to Jekyll for my blog.
There’s definitely a learning curve to using Jekyll (and Markdown), so I wouldn’t recommend it for those who don’t have much experience with command-line shenanigans. But for me, I think it will be just right, and I’m happy that I switched.
How Did I Migrate?
Oh boy. The migration process did not go as planned. I was hoping to get that done in about three hours, but it took me much longer than that, and the process spanned about four days (and it’s still not done, for reasons I will explain later). Fortunately, since the spring semester is over, there is no better time for me to work on this stuff.
Here’s a high-level overview of the steps:
- Migrate from Wordpress.com to Wordpress.org.
- Migrate from Wordpress.org to Jekyll
- Migrate comments using Disqus
- Proofread and check existing posts
The first step to do is one that took a surprisingly long time for me: I had to migrate from Wordpress.com to Wordpress.org. It took me a while to realize that there even was a distinction: Wordpress.com is hosted by Wordpress and they handle everything (including the price of hosting, so it’s free for us), but we don’t have as much control over the site, and the extensions they offer are absurdly overpriced. Wordpress.org, on the other hand, means we have more control over the site and can choose a domain name to get rid of that ugly “wordpress” text in the URL. Needless to say, this makes Wordpress.org extremely common among many professional bloggers and organizations.
In my case, I had been using Wordpress.com for seitad.wordpress.com, so what I had to do was go to
Bluehost, pay to create a Wordpress.org site, which I named
seitad.com, and then I could migrate. The migration process itself is pretty easy once you’ve
got a Wordpress.org site up, so I won’t go into detail on that. The reason why I used Bluehost is
because it’s a recommended Wordpress provider, and on their website there’s a menu option that you
can click to create a Wordpress.org site. Unfortunately, that’s about it for my praise, because I
otherwise really hate Bluehost. Did anyone else feel like Bluehost does almost nothing but shove
various “upgrade feature XXX for $YZ” messages down our throats? I was even misled by their pricing
situation and instead of paying $5 to “host” seitad.com for a month, I accidentally paid $71 to
host that site for a year. I did notice that they had a 30-day money back guarantee, so hopefully
I can hastily finish up this migration and request my money back so so I won’t have to deal with
Bluehost again3.
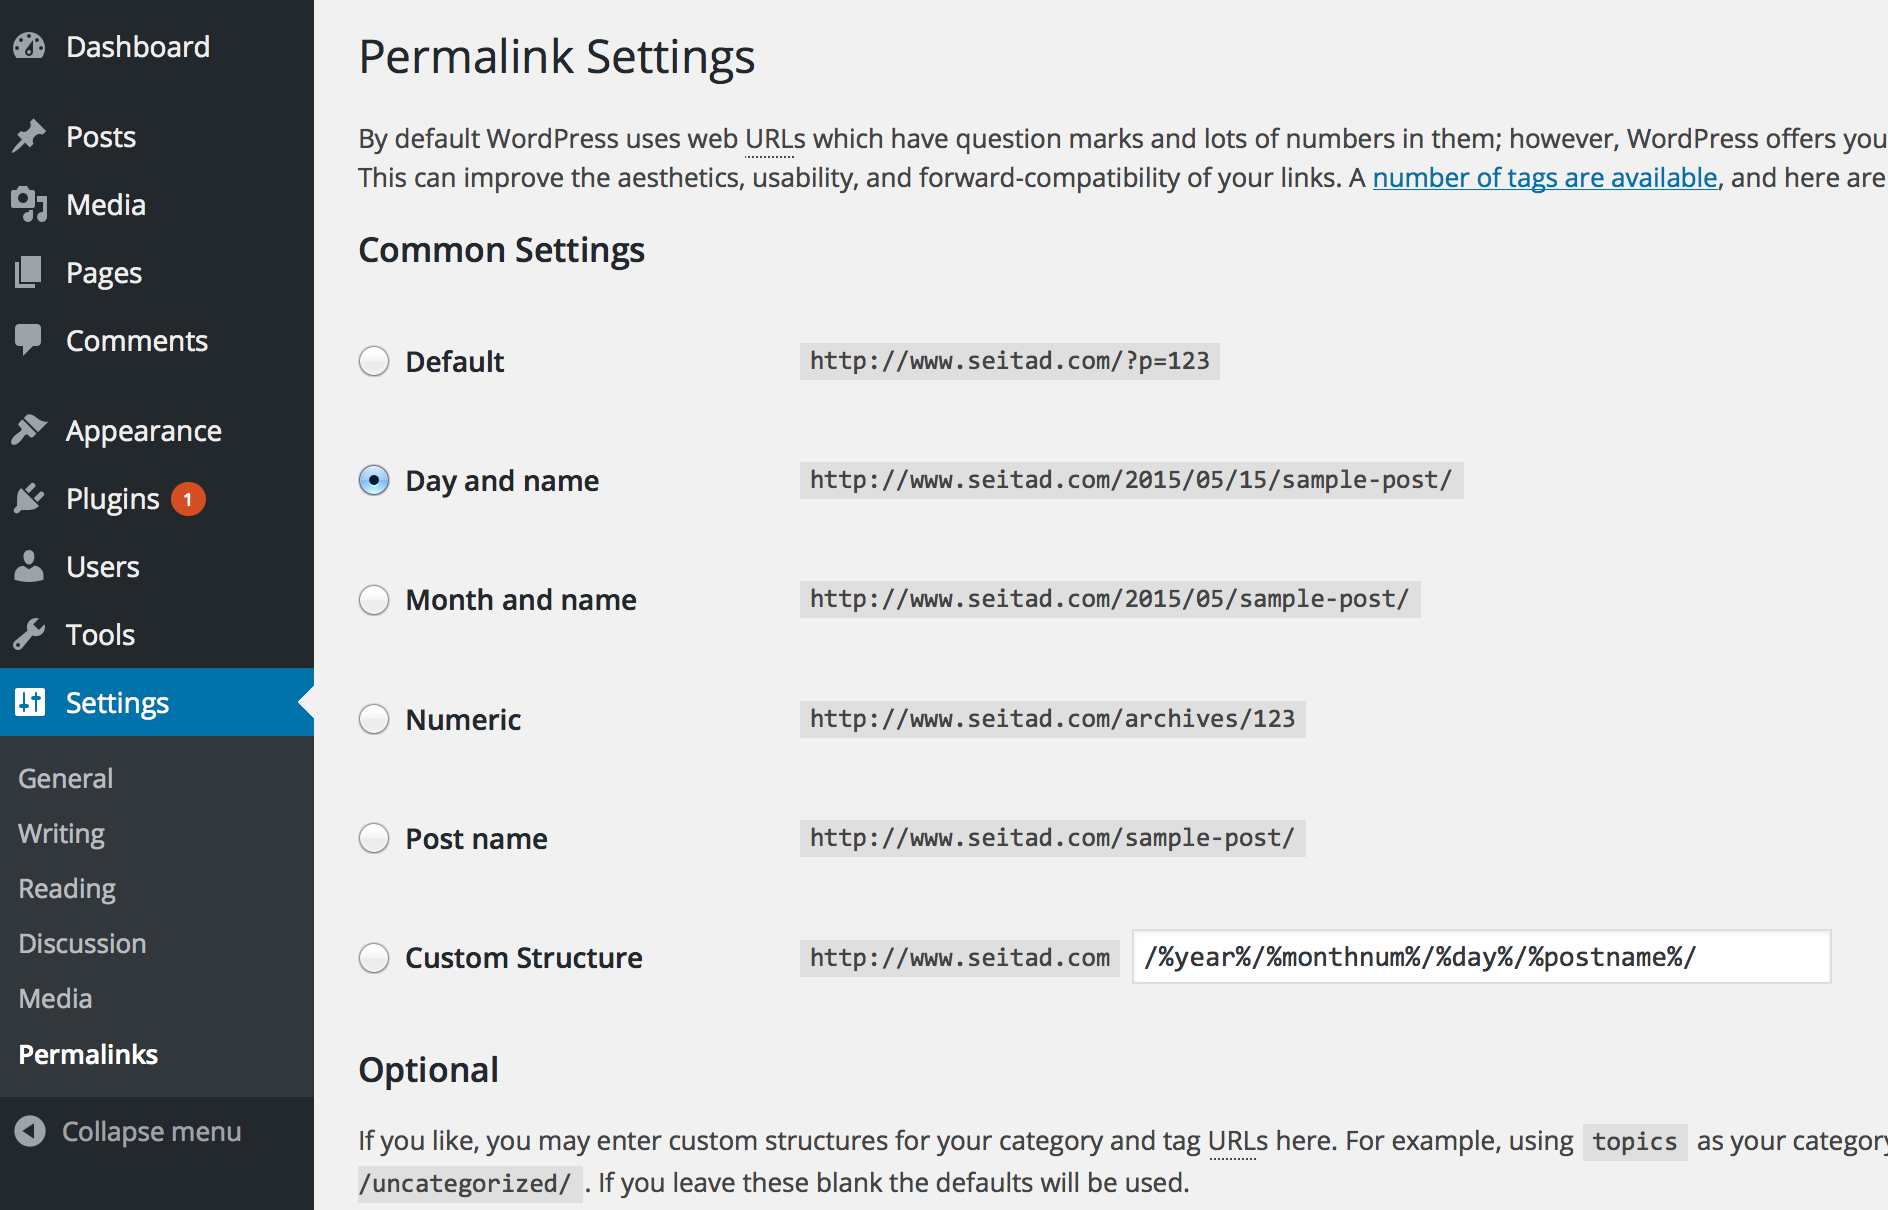
To clarify, the only reason why I am migrating to Wordpress.org is because the next step, using a Wordpress-to-Jekyll exporter plugin, only works on Wordpress.org sites, because Wordpress.com sites don’t allow external plugins to be installed. (Remember what I said earlier about how we don’t have much control over Wordpress.com sites? Case in point!) But before we do that, there’s a critical step we’ll want to do: change the permalinks for Wordpress to conform to Jekyll’s default style.
A permalink is the link extension given to a blog post after the end of the site URL. For
instance, suppose a site has address http://www.address.com. It might have a page called “News”
that one can click on, and that could have address http://www.address.com/news, and news would
be the permalink.
Modifying permalinks is not strictly necessary, but it will make importing comments later easy.
The default Wordpress.org scheme seems like it appends a “p” followed by an integer, and then a
question mark. We want to change it to match Jekyll’s default naming scheme, which is
/year/month/day/title, and we can do that by modifying the “Permalinks” section in the Wordpress
dashboard.
Now let’s discuss that Wordpress-to-Jekyll exporter I recently mentioned. This plugin, created by GitHub staff member Ben Balter, can be found (you guessed it) on GitHub. What you need to do is go to the “Releases” tab and download a .zip file of the code; I downloaded version 2.0.1. Then unzip it and follow the instructions that I’ve taken from the current README file:
- Place plugin in
/wp-content/plugins/folder - Activate plugin in WordPress dashboard
- Select Export to Jekyll from the Tools menu
Steps (2) and (3) shouldn’t need much explanation, but step (1) is the trickiest. The easiest way to
do this is to establish what’s known as an FTP connection to the Wordpress.org server, with the
“host name” field specified by the URL of the old site (in my case, seitad.com). What I did
was download FileZilla, a free FTP provider, and used its
graphical user interface to connect to my Wordpress.org site.
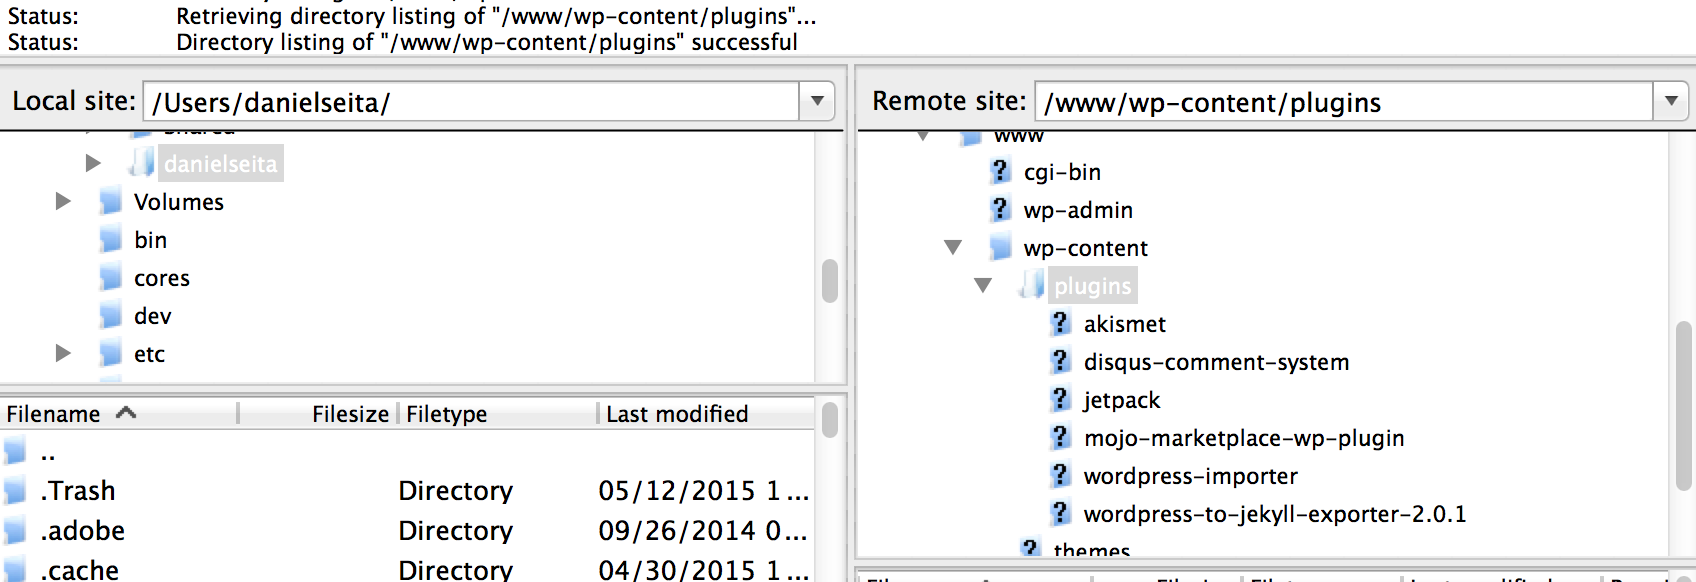
Note that to connect to the site, one does not generally use his or her Wordpress.org’s login, but
instead, one needs to use the login information from Bluehost4! Once I got over my initial
confusion, I was able to “drag and drop” the wordpress-to-jekyll exporter plugin to the Wordpress
site. You can see in the above image (of Filezilla) that I have the plugin in the correct directory
on the remote site. Executing steps (2) and (3) should then result in a jekyll-export.zip file
that contains the converted HTML-to-Markdown information about blog entries, as well as other
metadata such as the categories, tags, etc.
All right, now that we have our zip file, it’s time to create a Jekyll directory with the jekyll new
danieltakeshi.github.io command, where danieltakeshi should be replaced with whatever GitHub
username you have. Then take that jekyll-export.zip file and unzip it in this directory. This
should mean that all your old Wordpress posts are now in the _posts directory, and that they
are converted to Markdown, and that they contain some metadata. The importer will ask if you want
to override the default _config.yml file; I chose to decline that option, so _config.yml was
still set to be what jekyll new ... created for me.
The official Jekyll documentation contains a tool that you can use to convert from Wordpress (or Wordpress.com) to Jekyll. The problem with the Wordpress.com tool is that the original Wordpress.com posts are not converted to Markdown, but instead to plain HTML. Jekyll can handle HTML files, but to really get it to look good, you need to use Markdown. I tried using the Wordpress.org (not Wordpress.com) tool on the Jekyll docs, but I couldn’t get it to work due to missing some Ruby libraries that later caused a series of dependency headaches. Ugh. I think the simplicity and how the posts actually get converted to Markdown automatically are the two reasons why Ben’s external jekyll plugin is so popular among migrators.
At this point, it makes sense to try and commit everything to GitHub to see if the GitHub pages will
look good. The way that the username.github.io site works is that it gets automatically refreshed
each time you push to the master branch. Thus, in your blog directory, assuming you’ve already
initialized a git repository there, just do something like
$ git add .
$ git commit -m "First commit, praying this works..."
$ git push origin master
These commands5 will update the github repository, which automatically updates
username.github.io, so you can refresh the website to see your blog.
One thing you’ll notice, however, is that comments by default are not enabled. Moreover, old comments made on Wordpress.org are not present even with the use of Ben’s Wordpress-to-Jekyll tool. Why this occurs can be summarized as follows: Jekyll generates static pages, but comments are dynamic. So it is necessary to use an external system, which is where Disqus comes into play.
Unfortunately, it took me a really long time to figure out how to import comments correctly. I’ll summarize the mini-steps as follows:
- In the Admin panel for Disqus, create a new website and give it a “shortname” that we will need
later. (For this one, I used the shortname
seitasplace.) - In the Wordpress.org site, install the Disqus comment plugin6 and make sure your comments are “registered” with Disqus. What this means is that you should be able to view all comments in your blog from the Disqus Admin panel.
- Now comes the part that I originally missed, which took me hours to figure out: I had to import the comments with Disqus! It seems a little confusing to me (I mean, don’t I already have comments registered?), but I guess we have to do it. On Disqus, there is a “Discussions” panel, and then there’s a sub-menu option for “Import” (see the following image for clarification). There, we need to upload the .xml file of the Wordpress.org site that contains all the comments, which one can obtain without a plugin by going to Tools -> Export in the Wordpress dashboard.
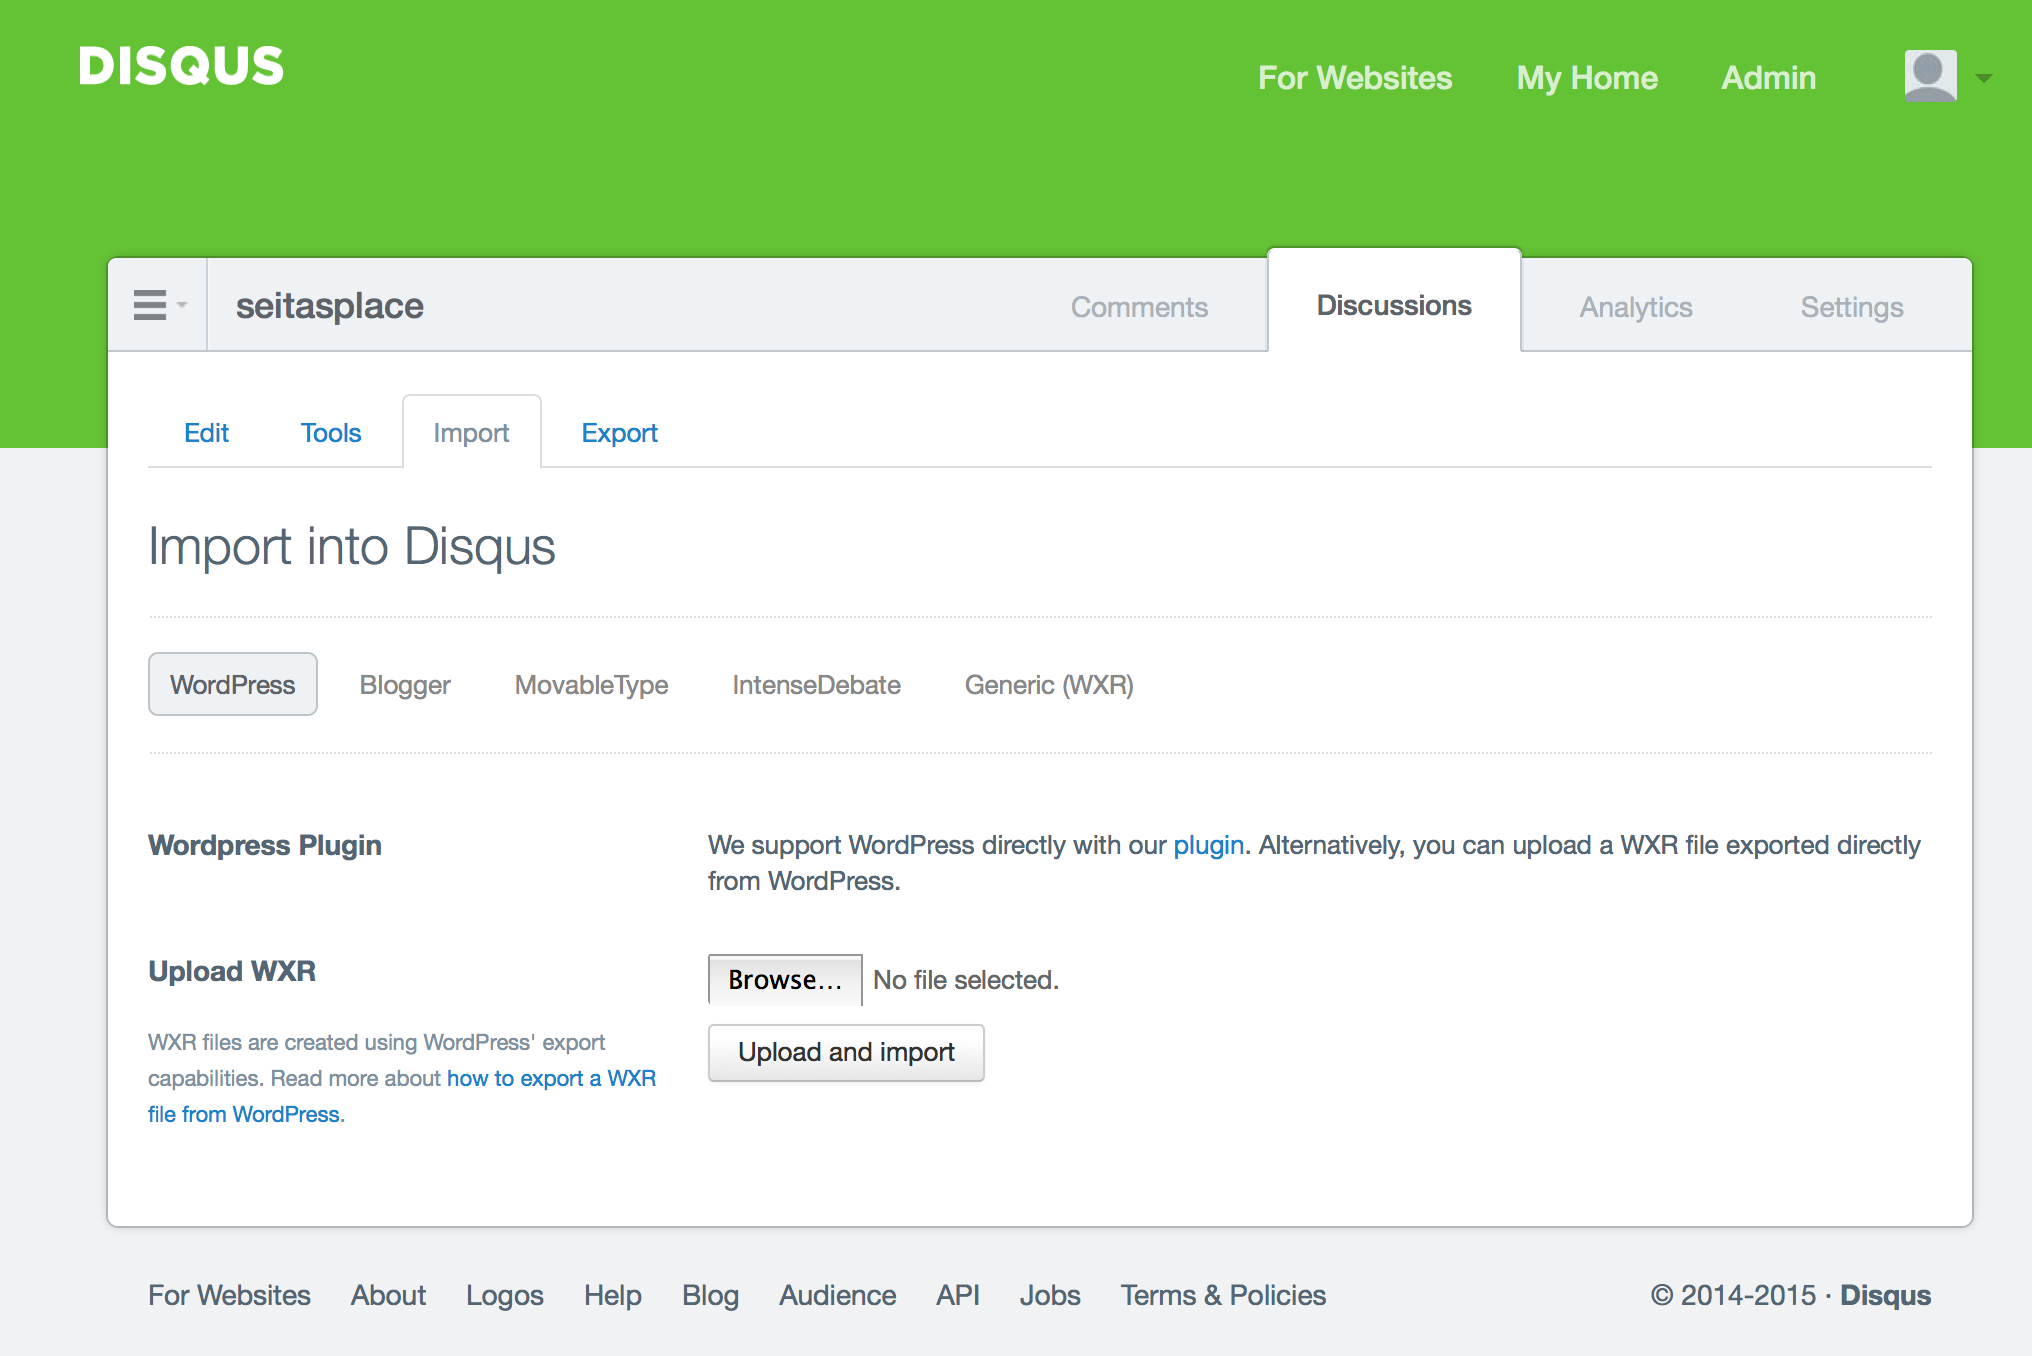
- You will also likely need to do some URL mapping. Comments in Disqus are stored relative to a URL, and the default URL is obviously the source from where it was imported! But if we’re migrating from source A to source B, doesn’t it make sense to have the comments default to source B’s URL instead of source A? In my case, I used a mapper in the “Tools” menu (in the above image) to convert all the comment links to be based on the current site’s URL. That way, if the original source (i.e., the Wordpress site) gets deleted, we still retain the comments7. If you made sure the permalinks match, then this process should be pretty easy.
- Finally, the last thing to do is to actually install Disqus comments in the code for wordpress.
For that, I went to the “Universal Code” option for Disqus, and pasted the HTML code there into
the
_layouts/post.htmlfile.
After several restarts due to some random issues with Disqus/Wordpress having problems with deleted material, I was finally able to get comments imported correctly, and they had the same names assigned to the commentators! Excellent! The traceback comments, which are created by Wordpress when one blog post links to another blog post, did not get copied over here, but I guess that’s OK with me. I mostly wanted the human comments, for obvious reasons.
Whew! So we are done, right? Oh, never mind – we have to proofread each post! Since I
had 151 posts from Wordpress to import, that meant I had to proofread every single one of them.
Ben’s importer tool is good but not perfect, and code- or math-heavy posts are especially difficult
to convert correctly. Even disregarding code and math, a common issue was that italicized text
wouldn’t get parsed correctly. Sometimes the Markdown asterisks were “one space too ahead”, e.g., if
the word code needs to be italicized, the Markdown syntax for that is *code*, but sometimes the
importer created *code *, and that danging space can create some ugly asterisks visible in the
resulting HTML.
Even after basic proofreading, there are still additional steps one needs to take in order to ensure a crisp blog. One needs to
- fix the links for the images, since the images by default are set to the original Wordpress
address. The Wordpress-to-Jekyll plugin will put the images in the
wp-contentfolder, but I (and the official Jekyll documentation) recommend copying those images over to anassetsfolder. The defaultwp-contentfolder contains too many folders and sub-directories for my liking, but I guess it’s useful if a blog contains thousands of images. - fix the post-to-post hyperlinks in each post to refer to the current Jekyll version. In vim, this should be easy as I can do a bunch of find-and-replace calls to each file. Ensuring that the Wordpress permalinks follow Jekyll-style permalinks makes this task easier.
- incorporate extra tools to get LaTeX formatting.
I haven’t been able to do all these steps yet, but I’m working on it8.
Whew! The best part about the migration is that you only have to do it once. Part of the problem is that I had to rely on a motley collection of blog posts to help me out. The Jekyll documentation itself was not very helpful9.
Post-Migration Plan
In addition to the actual migration, there are some sensible steps that users should take to ensure that they can extract maximal utility from Jekyll. For me, I plan to
- learn more Markdown10! And in addition, it makes sense to use a text editor that can
handle Markdown well. I’m using vim since it’s my default, but it’s actually not that useful to
me, because I set the syntax mode off (using
:syntax off) and by default vim does not have a Markdown highlighter. I’m sure someone has created a Markdown syntax add-on to vim, so I’ll search for that. - actually make the site look better! I don’t mind the simplicity of default Jekyll, but a little more “piazza” wouldn’t hurt. I’d like to at least get a basic “theme” up and running, and to include excerpts from each post on the front page.
- make a site redirect from my old Wordpress.com site, so that it redirects users to this site. I’d rather not delete the old site all of a sudden (even though I will delete it eventually). But I will get rid of that Wordpress.org site that I had to pay to create, all just to help me migrate to Jekyll.
Incidentally, now that we’ve covered the migration pipeline, I thought I should make it clear how
one would go about using Jekyll. To add new posts, one simply adds a file in the _posts directory
that follows the convention YYYY-MM-DD-name-of-post.ext and includes the necessary front matter,
which contains the title, the date, etc. Looking at the raw Markdown code of sample posts is
probably the easiest way to learn.
One could update the site with each edit by adding, committing, and pushing to GitHub, but probably
a better way is to update locally by running jekyll build; jekyll serve. This will create a local
copy of Jekyll that one can have open in a web browser even if one doesn’t have Internet access.
Each time one saves a post, the server will update, so by refreshing, we can see the edit. It won’t
catch all edits — I had to push to GitHub and then update the local copy to get images to show up
correctly — but it is useful enough that I thought I’d share (and suggest) it. Furthermore, if
the website is public, it’s best to update/push polished versions of posts rather than
works-in-progress.
Hopefully these personal notes prove useful to future Wordpress.{com,org}-to-Jekyll migrators. In the meantime, I’m going to fix up the rest of this site and prepare some new entries that accentuate some of Jekyll’s neat features.
-
By the way, saying something like “GitHub co-founder Tom …” is the computer programming equivalent of the law school saying “Yale Law School graduate Bob …”. The fact that he founded GitHub immediately hightens my opinion of him. Oh, by the way, do you like how Jekyll does footnotes? Just click the little arrow here and you’ll be back up to where you were in the article! ↩
-
If you have experience using GitHub, then you can even fork my repository on GitHub to serve as a launching point for your own site or to test out Jekyll. ↩
-
Just to be clear, if you host a site on a public GitHub repository, then it’s free. That’s yet another reason to use Jekyll/GitHub! ↩
-
This username information should be included in the first email (or one of the first, I think) you got from Bluehost. The password should be the password you use to log into Bluehost to get to your user control panel. ↩
-
If you’re wondering how I was able to get a code block highlighted like that, I wrap the commands with three tildas (
~~~) before and after the text. This is with thekramdownMarkdown scheme. ↩ -
Fortunately, you can find this plugin by searching in Wordpress directly; there’s no need to engage in fancy FTP stuff. ↩
-
Actually, I haven’t tested this yet. I hope this works. ↩
-
If you see things like dead links or any “weird” looking text here, please contact me. ↩
-
Interestingly enough, the Jekyll docs for migrating from Wordpress.com to Jekyll currently link to an external blog post from March 2011. I found that blog post to be reasonably helpful, but it didn’t really do what I needed, which tends to be a problem when following such guides. ↩
-
To add to the complexity, there are several different versions of Markdown. My site is currently using the
kramdownstyle, but another popular one (that GitHub pages use) isredcarpet, but that style messed up my footnotes, so I eschewed from using it. ↩