OpenAI's Generative Adversarial Imitation Learning Code
In an earlier blog post, I described how to use OpenAI’s Evolution Strategies code. In this post, I’ll provide a similar guide for their imitation learning code which corresponds to the NIPS 2016 paper Generative Adversarial Imitation Learning. While the code works and is quite robust (as I’ll touch upon later), there’s little documentation and on the GitHub issues page, people have asked variants of “please help me run the code!!” Thus, I thought I’d provide some insight into how the code works. Just like the ES code, it runs on a cluster, but I’ll specifically run it on a single machine to make life easier.
The code was written in early 2016, so it uses Theano instead of TensorFlow. The
first task for me was therefore to install Theano on my Ubuntu 16.04 machine
with a TITAN X GPU. The imitation code is for Python 2.7, so I also decided to
install Anaconda. If I want to switch back to Python 3.5, then I think I can
modify my .bashrc file to comment out the references to Anaconda, but maybe
it’s better for me to use virtual environments. I don’t know.
I then followed the installations to get the stable 0.9.0 version of Theano. My configuration looks like this:
[global]
floatX = float64
device = gpu

[cuda]
root = /usr/local/cuda-8.0
Unfortunately, I ran into some nightmares with installing Theano. I hope you’re
not interested in the details; I wrote them here on their Google Groups.
Let’s just say that their new “GPU backend” causes me more trouble than it’s
worth, which is why I kept the old device = gpu setting. Theano still seems to
complain and spews out warnings about the float64 setting I have here, but I
don’t have much of a choice since the imitation code assumes double precision
floats.
Yeah, I’m definitely switching back to TensorFlow as soon as possible.
Back to the code — how does one run it? By calling scripts/im_pipeline.py
three times, as follows:
python scripts/im_pipeline.py pipelines/im_classic_pipeline.yaml 0_sampletrajs
python scripts/im_pipeline.py pipelines/im_classic_pipeline.yaml 1_train
python scripts/im_pipeline.py pipelines/im_classic_pipeline.yaml 2_eval
where the pipeline configuration file can be one of the four provided options (or something that you provide). You can put these three commands in a bash script so that they automatically execute sequentially.
If you run the commands one-by-one from the imitation repository, you should
notice that the first one succeeds after a small change: get rid of the
Acrobot-v0 task. That version no longer exists in OpenAI gym. You could train
version 1 using their TRPO code, but I opted to skip it for simplicity.
That first command generates expert trajectories to use as input data for imitation learning. The second command is the heavy-duty part of the code: the actual imitation learning. It also needs some modification to get it to work for a sequential setting, because the code compiles a list of commands to execute in a cluster.
Those commands are all of the form python script_name.py [arg1] [arg2] .... I
decided to put them together in a list and then run them sequentially, which can
easily be done using this code snippet:
all_commands = [x.format(**y) for (x,y) in zip(cmd_templates,argdicts)]
for command in all_commands:
    subprocess.call(command.split(" "))
This is nifty: the x.format(**y) part looks odd, but x is a string format in
Python with arguments to be filled in by the values of y.
If running something like the above doesn’t quite work, you might want to check the following:
-
If you’re getting an error with pytables, it’s probably because you’re using version 3.x of the library, which changed
getNodetoget_node. Someone wrote a pull request for this which should probably get integrated ASAP. (Incidentally, pytables looks like a nice library for data management, and I should probably consider using it in the near future.) -
If you’re re-running the code, you need to delete the appropriate output directories. It can be annoying, but don’t remove this functionality! It’s too easy to accidentally run a script that overrides your old data files. Just manually delete them, it’s better.
-
If you get a lot of “Exception ignored” messages, go into
environments/rlgymenv.pyand comment out the__del__method in theRLGymSimclass. I’m not sure why that’s there. Perhaps it’s useful in clusters to save memory? Removing the method didn’t seem to adversely impact my code and it got rid of the warning messages, so I’m happy. -
Someone else mentioned in this GitHub issue that he had to disable multithreading, but fortunately I didn’t seem to have this problem.
Hopefully, if all goes well, you’ll see a long list of compressed files
containing relevant data for the runs. Here’s a snippet of the first few that I
see, assuming I used im_classic_pipeline.yaml:
alg=bclone,task=cartpole,num_trajs=10,run=0.h5
alg=bclone,task=cartpole,num_trajs=10,run=1.h5
alg=bclone,task=cartpole,num_trajs=10,run=2.h5
alg=bclone,task=cartpole,num_trajs=10,run=3.h5
alg=bclone,task=cartpole,num_trajs=10,run=4.h5
alg=bclone,task=cartpole,num_trajs=10,run=5.h5
alg=bclone,task=cartpole,num_trajs=10,run=6.h5
alg=bclone,task=cartpole,num_trajs=1,run=0.h5
alg=bclone,task=cartpole,num_trajs=1,run=1.h5
alg=bclone,task=cartpole,num_trajs=1,run=2.h5
alg=bclone,task=cartpole,num_trajs=1,run=3.h5
alg=bclone,task=cartpole,num_trajs=1,run=4.h5
alg=bclone,task=cartpole,num_trajs=1,run=5.h5
alg=bclone,task=cartpole,num_trajs=1,run=6.h5
The algorithm here is behavioral cloning, one of the four that the GAIL paper benchmarked. The number of trajectories is 10 for the first seven files, then 1 for the others. These represent the “dataset size” quantities in the paper, so the next set of files appearing after this would have 4 and then 7. Finally, each dataset size is run seven times from seven different initializations, as explained in the very last sentence in the appendix of the GAIL paper:
For the cartpole, mountain car, acrobot, and reacher, these statistics are further computed over 7 policies learned from random initializations.
The third command is the evaluation portion, which takes the log files and
compresses it all into a single results.h5 file (or whatever you called it in
your .yaml configuration file). I kept the code exactly the same as it was in
the original version, but note that you’ll need to have all the relevant
output files as specified in the configuration or else you’ll get errors.
When you run the evaluation portion, you should see for each policy instance, its mean and standard deviation over 50 rollouts. For instance, with behavioral cloning, the policy that’s chosen is the one that performed best on the validation set. For the others, it’s whatever appeared at the final iteration of the algorithm.
The last step is to arrange these results and plot them somehow. Unfortunately,
while you can get an informative plot using scripts/showlog.py, I don’t think
there’s code in the repository to generate Figure 1 in the GAIL paper, so I
wrote some plotting code from scratch. For CartPole-v0 and MountainCar, I got
the following results:
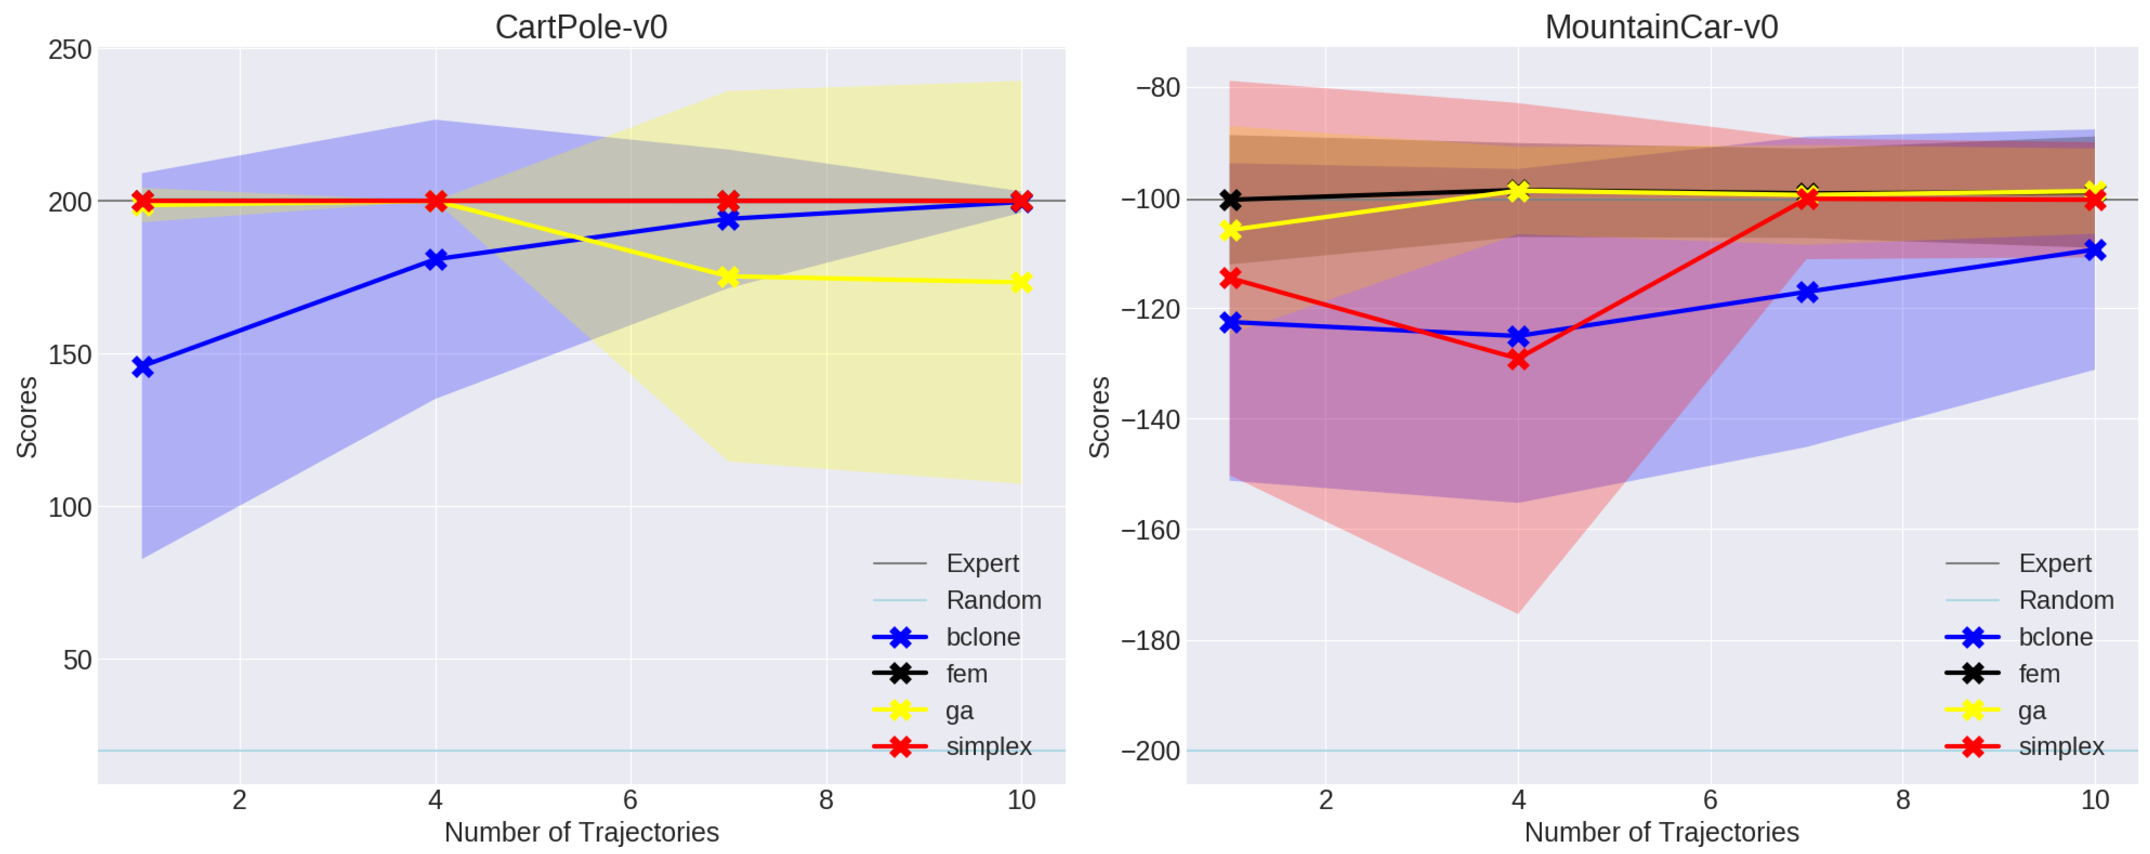
These are comparable with what’s in the paper, though I find it interesting that GAIL seems to choke with the size 7 and 10 datasets for CartPole-v0. Hopefully this is within the random noise. I’ll test with the harder environments shortly.
Acknowledgments: I thank Jonathan Ho for releasing this code. I know it seems like sometimes I (or other users) complain about lack of documentation, but it’s still quite rare to see clean, functional code to exactly reproduce results in research papers. The code base is robust and highly generalizable to various settings. I also learned some new Python concepts from reading his code. Jonathan Ho must be an all-star programmer.
Next Steps: If you’re interested in running the GAIL code sequentially, consider looking at my fork here. I’ve also added considerable documentation.