Getting Started with Blender for Robotics
Blender is a popular open-source computer graphics software toolkit. Most of its users probably use it for its animation capabilities, and it’s often compared to commercial animation software such as Autodesk Maya and Autodesk 3ds Max. Over the last one and a half years, I have used Blender’s animation capabilities for my ongoing robotics and artificial intelligence research. With Blender, I can programmatically generate many simulated images which then form the training dataset for deep neural network robotic policies. Since implementing domain randomization is simple in Blender, I can additionally perform Sim-to-Real transfer. In this blog post, and hopefully several more, I hope to demonstrate how to get started with Blender, and more broadly to make the case for Blender in AI research.
As of today’s writing, the latest version is Blender 2.83, which one can download from its website for Windows, Mac, or Linux. I use the Mac version on my laptop for local tests and the Linux version for large-scale experiments on servers. When watching older videos of Blender or borrowing related code, be aware that there was a significant jump between Blender 2.79 and Blender 2.80. By comparison, the gap between versions 2.80 to 2.83 is minor.
Installing Blender is usually straightforward. On Linux systems, I use wget
to grab the file online from the list of releases here. Suppose one wants
to use version 2.82a, which is the one I use these days. Simply scroll to the
appropriate release, right-click the desired file, and copy the link. I then
paste it after wget and run the command:
wget https://download.blender.org/release/Blender2.82/blender-2.82a-linux64.tar.xz
This should result in a *.tar.xz file, which for me was 129M. Next, run:
tar xvf blender-2.82a-linux64.tar.xz
The v is optional and is just for verbosity. To check the installation, cd
into the resulting Blender directory and type ./blender --version. In
practice, I recommend setting an alias in the ~/.bashrc like this:
export PATH=${HOME}/blender-2.82a-linux64:$PATH
which assumes I un-tarred it in my home directory. The process for installing
on a Mac is similar. This way, when typing in blender, the software will open
up and produce this viewer:

The starting cube shown above is standard in default Blender scenes. There’s a lot to process here, and there’s a temptation to check out all the icons to see all the options available. I recommend resisting this temptation because there’s way too much information. I personally got started with Blender by watching this set of official YouTube video tutorials. (The vast majority have automatic captions that work well enough, but a few strangely have captions in different languages despite how the audio is clearly in English.) I believe these are endorsed by the developers, or even provided by them, which attests to the quality of its maintainers and/or community. The quality of the videos is outstanding: they cover just enough detail, provide all the keystrokes used to help users reproduce the setup, and show common errors.
For my use case, one of the most important parts of Blender is its scripting capability. Blender is tightly intertwined with Python, in the sense that I can create a Python script and run it, and Blender will run through the steps in the script as if I had performed the equivalent manual clicks in the viewer. Let’s see a brief example of how this works in action, because over the course of my research, I often have found myself adding things manually in Blender’s viewer, then fetching the corresponding Python commands to be used for scripting later.
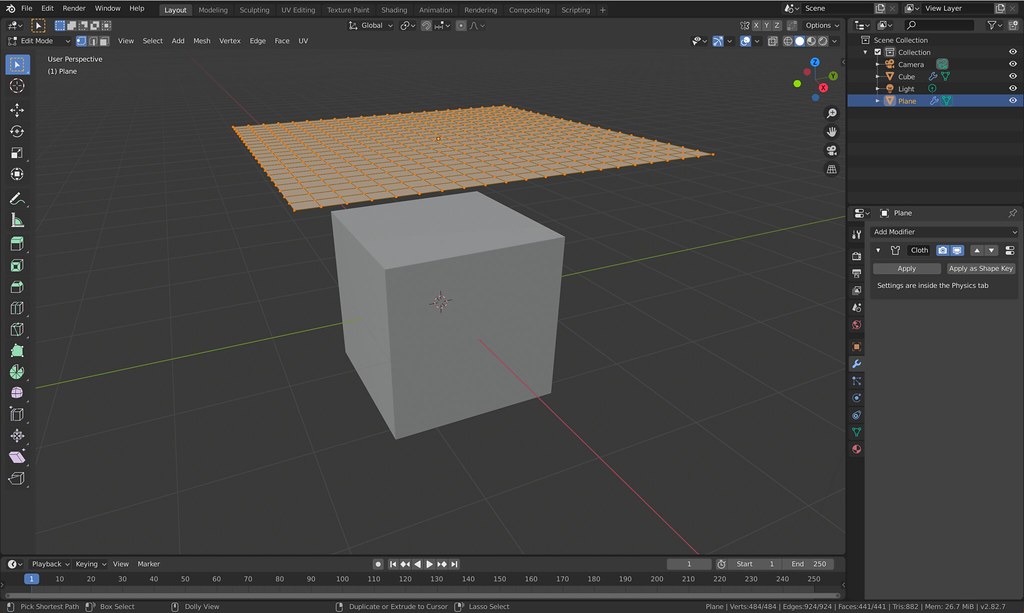
Let’s suppose we want to create a cloth that starts above the cube and falls on it. We can do this manually based on this excellent tutorial on cloth simulation. Inside Blender, I manually created a “plane” object, moved it above the cube, and sub-divided it by 15 to create a grid. Then, I added the cloth modifier. The result looks like this:
But how do we reproduce this example in a script? To do that, look at the Scripting tab, and the lower left corner window in it. This will show some of the Python commands (you’ll probably need to zoom in):
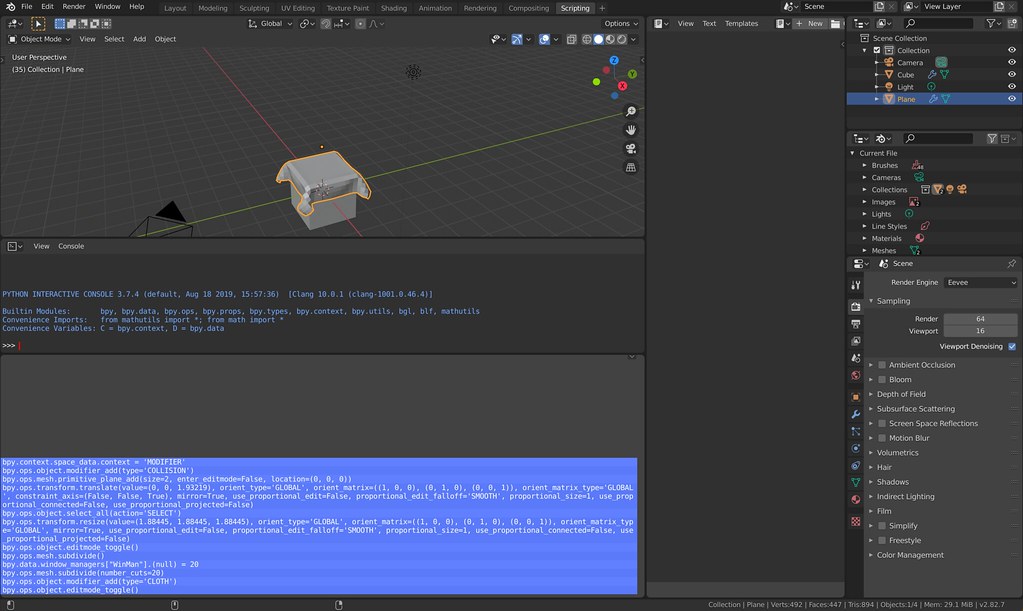
Unfortunately, there’s not always a perfect correspondence of the commands here and the commands that one has to actually put in a script to reproduce the scene. Usually there are commands missing from the Scripting tab that I need to include in my actual scripts in order to get them working properly. Conversely, some of the commands in the Scripting tab are irrelevant. I have yet to figure out a hard and fast rule, and rely on a combination of the Scripting tab, borrowing from older working scripts, and Googling stuff with “Blender Python” in my search commands.
From the above, I then created the following basic script:
# Must be imported to use much of Blender's functionality.
import bpy

# Add collision modifier to the cube (selected by default).
bpy.ops.object.modifier_add(type='COLLISION')

# Add a primitive plane (makes this the selected object). Add the translation
# method into the location to start above the cube.
bpy.ops.mesh.primitive_plane_add(size=2, enter_editmode=False, location=(0, 0, 1.932))

# Rescale the plane. (Could have alternatively adjusted the `size` above.)
# Ignore the other arguments because they are defaults.
bpy.ops.transform.resize(value=(1.884, 1.884, 1.884))

# Enter edit-mode to sub-divide the plane and to add the cloth modifier.
bpy.ops.object.editmode_toggle()
bpy.ops.mesh.subdivide(number_cuts=15)
bpy.ops.object.modifier_add(type='CLOTH')

# Go back to "object mode" by re-toggling edit mode.
bpy.ops.object.editmode_toggle()
If this Python file is called test-cloth.py then running blender -P
test-cloth.py will reproduce the setup. Clicking the “play” button at the
bottom results in the following after 28 frames:
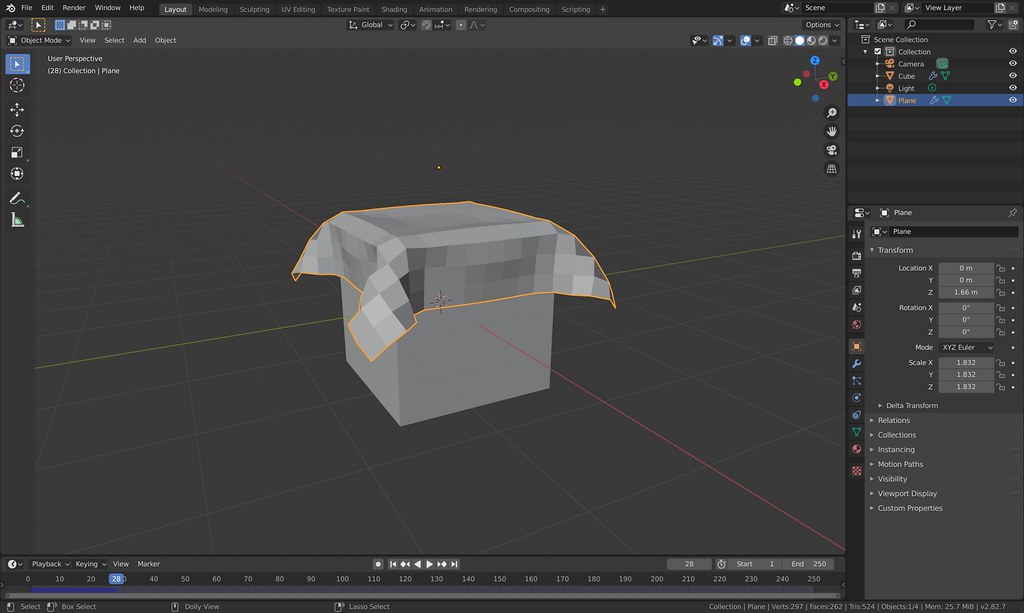
Nice, is it? The cloth is “blocky” here, but there are modifiers that can and will make it smoother.
The Python command does not need to be done in a “virtualenv” because Blender uses its own Python. Please see this Blender StackExchange post for further details.
There’s obviously far more to Blender scripting, and I am only able to scratch the surface in this post. To give an idea of its capabilities, I have used Blender for the following three papers:
- Deep Imitation Learning of Sequential Fabric Smoothing From an Algorithmic Supervisor, which is currently under review and available as a preprint on arXiv.
- Visuospatial Foresight for Multi-Step, Multi-Task Fabric Manipulation, which will appear at RSS 2020 in a few weeks.
- Learning to Smooth and Fold Real Fabric Using Dense Object Descriptors Trained on Synthetic Color Images, which is currently under review and available as a preprint on arXiv.
The first two papers used Blender 2.79, whereas the third used Blender 2.80. The first two used Blender solely for generating (domain-randomized) images from cloth meshes imported from external software, whereas the third created cloth directly in Blender and used the software’s simulator.
In subsequent posts, I hope to focus more on Python scripting and the cloth simulator in Blender. I also want to review Blender’s strengths and weaknesses. For example, there are good reasons why the first two papers above did not use Blender’s built-in cloth simulator.
I hope this served as a concise introduction to Blender. As always, thank you for reading.